How to Clean Shower Head Vinegar Easily with Simple Home Methods
A clogged shower head can reduce water pressure, create uneven spray patterns, and even encourage the buildup of bacteria and mineral deposits. Fortunately, learning how to clean shower head vinegar is one of the easiest and most affordable ways to restore your shower head’s performance without using harsh chemicals.
Over time, hard water leaves behind calcium, lime, and other mineral deposits that block the tiny spray holes. If ignored, these deposits can reduce water flow and make your shower less enjoyable. Regular cleaning helps remove buildup, improves water pressure, and extends the life of your shower head.
White vinegar is a popular cleaning solution because its mild acidity naturally dissolves mineral deposits while being safe for most standard metal and plastic shower heads. Combined with proper maintenance, it can keep your bathroom fixtures looking clean and functioning efficiently.
This guide explains everything you need to know, including why shower heads become clogged, the materials you’ll need, step-by-step cleaning methods, common mistakes to avoid, maintenance tips, and answers to frequently asked questions.
Why Shower Heads Become Clogged
Before learning how to clean shower head vinegar, it helps to understand why buildup occurs in the first place.
The most common cause is hard water. Water containing high levels of calcium and magnesium leaves mineral deposits behind every time you use the shower. As these deposits accumulate, they gradually block the small spray holes.
Other causes include:
- Soap residue
- Dirt and sediment
- Rust particles from older plumbing
- Mold and mildew
- Bacteria buildup
- Long periods without cleaning
Cleaning the shower head regularly prevents these problems from becoming severe.
Why Vinegar Works So Well
White vinegar contains acetic acid, which helps dissolve mineral deposits without damaging most shower head materials.
Some advantages of using vinegar include:
Removes Hard Water Deposits
Vinegar breaks down calcium and lime buildup that restricts water flow.
Improves Water Pressure
Clearing blocked spray holes allows water to flow more evenly.
Affordable Cleaning Method
A bottle of white vinegar costs very little compared to commercial cleaning products.
Easy to Find
Most households already have white vinegar available in the kitchen.
Environmentally Friendly
Unlike many chemical cleaners, vinegar is biodegradable and produces fewer harmful residues.
Supplies You’ll Need
Before starting, gather these simple household items.
- White vinegar
- Plastic bag
- Rubber band or zip tie
- Soft toothbrush
- Microfiber cloth
- Small bowl
- Warm water
- Toothpick or soft plastic pick for stubborn holes
These inexpensive supplies are enough for most cleaning jobs.
How to Clean Shower Head Vinegar Without Removing It
This is the easiest cleaning method and works well for routine maintenance.
Step 1 Prepare the Vinegar
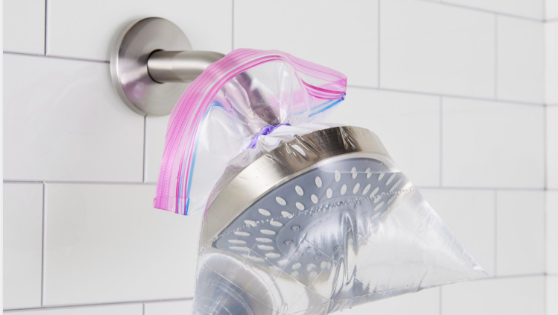
Fill a sturdy plastic bag with enough white vinegar to completely cover the shower head.
Step 2 Attach the Bag
Carefully place the bag over the shower head so the spray surface is fully submerged.
Secure the bag tightly using a rubber band or zip tie.
Step 3 Allow It to Soak
Leave the shower head soaking for several hours.
For heavy mineral buildup, many people allow it to soak overnight.
Step 4 Remove the Bag
Carefully remove the plastic bag and dispose of the used vinegar.
Step 5 Scrub the Surface
Use a soft toothbrush to gently scrub away loosened mineral deposits around the spray holes.
Step 6 Flush the Shower Head
Turn on the hot water for several minutes to flush out remaining debris from inside the shower head.
How to Clean a Removable Shower Head
Some shower heads can be removed easily for deeper cleaning.
Remove the Shower Head
Unscrew the shower head carefully using your hands or the appropriate tool if necessary.
Prepare a Vinegar Bath
Fill a bowl with enough white vinegar to completely cover the shower head.
Soak Thoroughly
Allow the shower head to soak until the mineral deposits begin to dissolve.
Scrub Remaining Deposits
Clean around the spray holes with a toothbrush.
Use a soft plastic pick only if necessary to clear stubborn openings.
Rinse Completely
Rinse with warm water before reinstalling the shower head.
Reattach the Shower Head
Install the shower head securely and test the water flow.
Benefits of Cleaning Your Shower Head Regularly
Routine cleaning offers several important advantages.
Better Water Pressure
Removing mineral deposits allows water to flow freely.
More Even Spray Pattern
Blocked nozzles often create uneven streams of water. Cleaning restores consistent performance.
Longer Fixture Life
Preventing mineral buildup helps reduce wear on internal components.
Improved Bathroom Hygiene
Regular cleaning removes dirt, bacteria, and other unwanted buildup.
Better Shower Experience
A clean shower head provides a stronger, more comfortable spray that improves your daily routine.
How Often Should You Clean a Shower Head?
Cleaning frequency depends on your local water quality.
General recommendations include:
- Every month in areas with hard water
- Every two to three months for moderate mineral buildup
- Immediately if water pressure decreases noticeably
- More frequently if you observe visible mineral deposits
Regular maintenance makes future cleaning much easier.
Common Mistakes to Avoid
While learning how to clean shower head vinegar, avoiding a few common mistakes can help protect your shower head and improve cleaning results.
Using the Wrong Type of Vinegar
White distilled vinegar is the best choice because it effectively removes mineral deposits without leaving stains or sticky residue.
Forgetting to Rinse
After soaking, always rinse the shower head thoroughly with clean water. This removes loosened minerals and any remaining vinegar.
Scrubbing Too Hard
Using wire brushes or abrasive cleaning pads may scratch the surface or damage the finish. A soft toothbrush is usually enough.
Ignoring the Rubber Washer
If you remove the shower head, inspect the rubber washer before reinstalling it. A damaged washer can cause leaks.
Waiting Too Long Between Cleanings
Heavy mineral buildup becomes more difficult to remove over time. Regular maintenance keeps cleaning simple.
Can Vinegar Damage a Shower Head?
For most standard metal and plastic shower heads, white vinegar is safe when used correctly.
However, there are a few exceptions.
Natural stone finishes, unfinished brass, and certain specialty coatings may not tolerate prolonged exposure to vinegar. Always check the manufacturer’s care instructions before soaking decorative or premium shower heads.
If you are unsure, test a small hidden area or limit the soaking time.
Alternative Cleaning Methods
Although vinegar is one of the most popular cleaning solutions, there are other options.
Baking Soda Paste
Mix baking soda with a small amount of water to create a paste. Apply it to stubborn mineral deposits and gently scrub before rinsing.
Mild Dish Soap
Dish soap helps remove soap scum and everyday dirt from the exterior surface of the shower head.
Commercial Descaling Products
Products designed for removing lime and calcium deposits may be useful for severe buildup. Always follow the manufacturer’s instructions carefully.
Warm Water Rinse
Regularly flushing the shower head with warm water can help reduce light mineral deposits before they become serious.
Maintenance Tips
Routine maintenance keeps your shower head performing efficiently for years.
Follow these simple practices:
- Wipe the shower head dry after cleaning.
- Inspect the spray holes regularly.
- Clean visible mineral deposits before they harden.
- Check for leaks around the connection.
- Flush the shower head with hot water occasionally.
- Replace worn washers if necessary.
- Keep the surrounding shower area clean.
Small maintenance tasks help prevent major problems later.
Signs Your Shower Head Needs Cleaning
Your shower head may require cleaning if you notice any of the following:
- Reduced water pressure
- Uneven spray pattern
- Water spraying in different directions
- Visible white mineral deposits
- Slow water flow
- Blocked spray holes
- Unpleasant odors
- Water dripping after the shower is turned off
Addressing these signs early can improve performance and extend the life of the fixture.
Tips to Reduce Hard Water Buildup
Although mineral deposits cannot always be avoided, you can reduce their impact.
Helpful strategies include:
- Clean the shower head regularly.
- Dry the shower head after use when possible.
- Install a whole-house water softener if hard water is severe.
- Use a shower filter designed for mineral reduction.
- Inspect plumbing fixtures periodically.
- Remove visible deposits before they become thick.
Consistent maintenance reduces the amount of cleaning required.
Best Practices
Following a few best practices will help keep your shower head clean and functioning properly.
- Use white distilled vinegar for routine cleaning.
- Clean the shower head every one to three months, depending on water quality.
- Avoid harsh metal brushes and abrasive cleaners.
- Rinse thoroughly after soaking.
- Inspect spray holes during every cleaning.
- Follow the manufacturer’s maintenance recommendations.
- Replace severely damaged shower heads when necessary.
These habits help maintain strong water pressure and improve the overall shower experience.
If you want more practical home maintenance guides related to how to clean shower head vinegar, visit themarginist.com. The website provides useful information about household cleaning, bathroom maintenance, DIY improvement projects, and home care tips to help homeowners keep their living spaces clean, efficient, and well maintained.
Final Thoughts
Learning how to clean shower head vinegar is a simple and cost-effective way to improve water pressure, remove mineral deposits, and extend the life of your bathroom fixture. With only a few household supplies and a little time, you can restore your shower head without relying on harsh chemicals.
Regular maintenance not only keeps your shower working efficiently but also helps prevent stubborn buildup in the future. By following the steps and best practices outlined in this guide, you can enjoy a cleaner shower head and a more comfortable shower every day.
Frequently Asked Questions
How do you clean a shower head with vinegar?
Fill a plastic bag with white vinegar, secure it around the shower head so it is fully submerged, allow it to soak for several hours or overnight, scrub gently with a soft toothbrush, and rinse thoroughly with warm water.
How long should I soak a shower head in vinegar?
Most shower heads can be soaked for several hours. For heavy mineral buildup, soaking overnight often provides better results.
Can vinegar remove hard water deposits?
Yes. The acetic acid in white vinegar dissolves calcium, lime, and other mineral deposits that commonly clog shower heads.
Is vinegar safe for all shower heads?
White vinegar is generally safe for most standard metal and plastic shower heads. However, some specialty finishes and natural stone materials may require different cleaning methods.
How often should I clean my shower head with vinegar?
If you have hard water, cleaning once a month is recommended. In areas with softer water, every two to three months is usually sufficient.
Why is my shower head still clogged after cleaning?
Heavy mineral deposits inside the shower head may require a longer soaking time or additional gentle scrubbing. In some cases, replacing an old or heavily damaged shower head may be the best solution.
Can I use apple cider vinegar instead of white vinegar?
White distilled vinegar is recommended because it is clear, inexpensive, and leaves less residue than apple cider vinegar.
What are the benefits of cleaning a shower head regularly?
Regular cleaning improves water pressure, restores an even spray pattern, removes mineral deposits, supports better hygiene, and helps extend the lifespan of your shower head.